Download Mac Os Sierra 10.12 Version Not 10.12.6
The Apples macOS Sierra has approached loftier version which is called "macOS Loftier Sierra". Different usual this time once more, the OS is innovatively designed and focused on cadre features. Except this, there are tons of major changes and enhanced graphics level like its better photos, 5k resolution, and file organization. These brillant features has attracted users and attempt them to install specially on PC. No worries, you can do it now, no need to wait if y'all're on PC or Mac. If you are a Mac users, so you can download the macOS Loftier Sierra 10.13 from App shop merely if you are PC user then you've got the gamble to do it from the guide here. In our previous article, nosotros downloaded the macOS High Sierra VMware Image. In this commodity, I'm going to show you how to install macOS High Sierra 10.13 on VMware in Windows 10, 8 or vii.

Unlike before, this time, nosotros're covering every department of guiding users to get what they want from this commodity. As in our previous commodity, nosotros downloaded macOS High Sierra ten.13 simply. At present we're going to install macOS High Sierra on VMware in Windows. Except it, following your comments, if y'all had issues or errors during installation, we will encompass and solve it if possible by us in an article, stay on and savour.
Important:Hey Folks, the next version of macOS is out, here's you tin observe and really download + install, with the complete guide.
Install macOS High Sierra 10.thirteen on VMware in Windows
Before we get started, there are several points you need to make sure yous have full-filled the requirements and accomplished the of import notes from beneath.
Remember: Earlier we begin installation, brand sure you take enabled virtualization on your PC and VMware too. Here'south how to practise it:-
#Step ane: Download & total-fil the requirements
Required Organisation
- 2GB Memory(RAM)
- Number of Processors: 2
- Difficult Deejay: 80GB
- Graphics memory: 256 MB
Want to give a quick shot to Mojave? Here's how to do it actually with stride by step shots.

Required files to download
Google Bulldoze (One Total):http://bit.ly/2vstWgr
Google Drive (five of 5):http://bit.ly/2vogTvx
Unlocker208:http://bit.ly/2uYuur7
VMware Workstation:http://bit.ly/1izV0je
Fix Download Limit:http://bit.ly/2f7JPlj
If you wish to download macOS High Sierra latest version please use to link below ;
#Step 2: Extract & run the downloaded files
1.After download, the files, extract them in a folder.

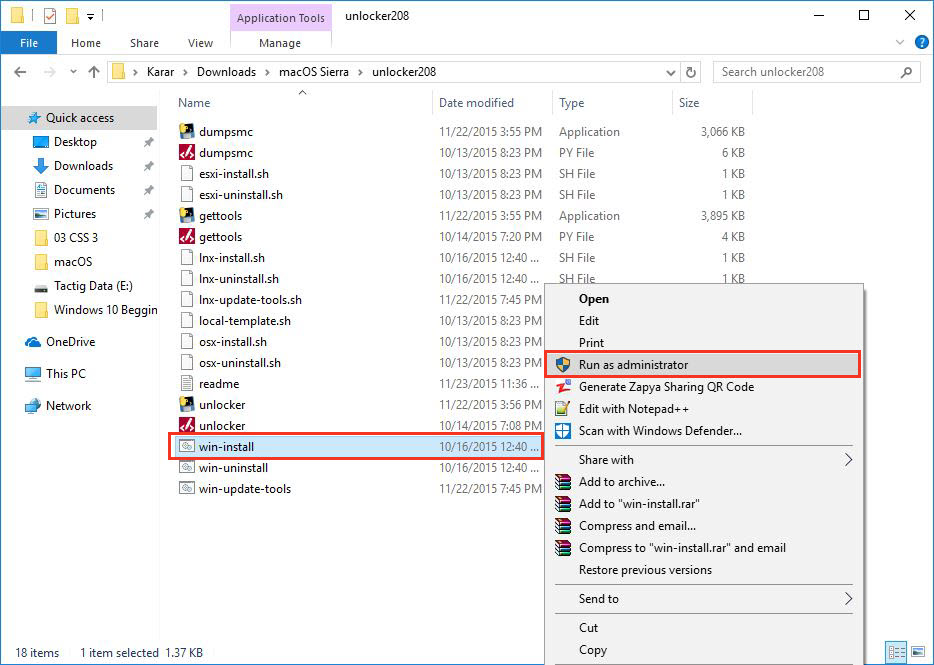
2.At present open Unlocker208 and open up " win-install" and Run as administrator.
#Step 3: Create a New Virtual Machine in VMware
1. Open VMware Workstation and click on "Create a New Virtual Machine" or but press " Ctrl + N" to open New Virtual Car Wizard. When opened, allow it by default and click Next.

2. On this folio, select "I will install the operating system later" and click Side by side.

3. Yep, you're right, select Apple Mac Bone 10 and OS version then hit Next.

four.Personalize and select a preferredlocation for the virtual motorcar and click Next.

5. Hither specify the disk capacity by storing virtual disk every bit single file and twoscore gig-byte for maximum disk size then continue installation past hittingSide by side.

vi.On the finish line, customize hardware if y'all want and go forEnd.

#Step iv: Configure & Edit the Virtual Car
1.When the virtual machine created, yous're ready to edit the VM, hit Edit virtual auto settings to continue.

2.Remove the existing hd by selecting the hard disk and click Remove.

three.After removing the hard disk, striking Add on the Virtual Machine Settingsand follow the instructions from below.

4.Here you need to selectemploy an existing virtual disk and clickNext.

5. Scan the MacOS High Sierra (VMDK) from the extracted folder that y'all had downloaded so clickF inishso clickOk on virtual machine settings.

#Footstep 5: Edit the Virtual Machine & Insert Code
1.When you accept finished configuration, now you demand to edit the virtual machine and insert control from below. To do that navigate to virtual auto files and open up "virtual machine configuration(VMX)" with Notepad like the shot beneath.

2.On the Notepad, insert the command below or you tin copy and paste from beneath.
smc.version = "0"

#Step 6: Install macOS High Sierra x.13 on VMware
Once you accept completed the steps higher up, then you're able to install it correct now. To do that, press the power push button to start the virtual machine. When the machine started, on the first screen y'all'll see the welcome folio, choose your state then clickProceed.
If you encounter "Failed to open a session for the virtual machine" or "VT-x isn't available" yous may check out this.

At present choose a keyboard layout and strikingProceed.

SelectDon't transfer whatever information now and hit enter.

On this page, sign in with your Apple tree ID otherwise select Don't sign in andProceed or if you don't have an Apple tree ID and want to create one here's how to practice:-
How to Create an Apple ID Without a Credit Card?

Read the Terms and conditions fully and clickAgree.

Step #viii: Personalize Your Mac
So let's personalize our figurer by filling out the required details thenContinue.

This new limited setup page works as location services and it will locate your location, Continue.

At present your account will be create within few minutes and yous'll finally got it like the shot below.

All right, at present the only thing y'all demand to exercise is installing VMware Tools which is very important.
that's all. Hope you could install without error and if you lot got any issue, identify it in comments form. We will reply every bit soon as possible likewise nosotros will create another commodity based on your issues for other users if they got, and so they can solve it chop-chop. Stuck booting up or can't change the screen or practice you have another trouble? No matter, here's the solution, click the link below and try one the solution methods from the listing.
Notice that if you lot confront boot manager problem or any other issues, check out the step #3 and use the lawmaking without quotation marks or you can try the whole tutorial in one case again if once again not succeed, and so attempt to bank check your laptop/PC if it'southward not AMD, if it is so you can't practice it or if your organisation is Intel then go and cheque the steps clearly and check one time again or practise it on another estimator.
When the macOS High Sierra installed successfully, now pace through essential setting up your Mac after installation. Click the link below and follow the steps.
Searches related to macos high sierra vmware
high sierra vmwarefusion
vmwarefusion apfs
macos high sierra vmwarefusion
vmwarefusion tech preview
vmwareapfs
vmwarefusion nine beta
install loftier sierra vmwarefusion
vmwaretools high sierra
Download Mac Os Sierra 10.12 Version Not 10.12.6
Posted by: mastrangeloefece1947.blogspot.com


0 Comentarios